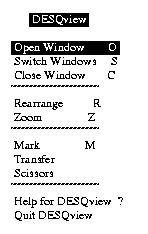
To open a tool, first select the Open Window item from the DESQview menu. This can be done by either moving the cursor over the item with the cursor keys or mouse and hitting the space bar, Enter key or left mouse button, or by simply typing the letter O. This will open up the Open Window menu. From here, a tool can be selected either by moving the cursor over the entry and hitting the space bar or the enter key or by typing the letters associated with the tool. If the entry is not visible on this menu, the Page Down key can be used to list more entries. Once selected, a window will be opened for that tool.
DESQview also provides an interface for managing the windows. These functions include: moving, resizing, scrolling, closing and switching windows. See the DESQview manual for details about these and other functions provided by the DESQview interface.
In various situations there will be a selection of fields presented
from which the user must choose, or a field in which the user
must enter text.
In general, the cursor keys or the mouse can
be used to move between the fields and the space bar, Enter key
or left mouse button can be used to select the field the cursor
is over.
The exception is in the case of a window that has a
field in which text is to be entered.
In this case the
Each of the tools that conform to the Common User
Interface (LE Panel, LE ASMB, ED PLD, and TERM) have a common
menu interface.
Across the top of the window of each of these
tools, is a menu bar consisting of six fields.
The first is the
name of the application and has a special function described later.
The next five are menu fields, the first labeled File,
the fourth and the fifth labeled Tools and HELP
respectively.
The second and third menu fields are labeled differently
for each tool.
Each of the menu fields is associated with a function
key shown parenthetically in each field.
The date of the last
modification of the tool is shown on the far right of the menu
bar.
The menus can be activated either by selecting them as described
above or by pressing the associated function key.
For example,
the Tools menu can be activated by pressing the F4 key.
When
a menu is activated, a small pull-down menu containing a list
of possible selections is displayed below the menu title.
The
Display menu for the LE Panel tool is shown in Figure 2.
Displayed
to the right of each selection is an associated key stroke.
The
key strokes preceded by an `A-' refer to the key combined with
the
The first field of the menu bar which contains the name of the
tool, is the icon field.
When selected, the window for the tool
is reduced to the size of this field and positioned at the far
right of the screen.
When selected again, the window is expanded
to full size and repositioned.
This is useful when you want to
hide the window for a time without exiting the tool.
At various times the user will be prompted for input with a dialog
box.
This is simply a small window that appears on top of the
current window and has a selection of fields to choose from and/or
a field in which to enter text.
The fields can be selected as
described above.
Figure 3 shows a field definition dialog box from
the LE Panel tool.
When a requested operation requires a file name, the user is prompted
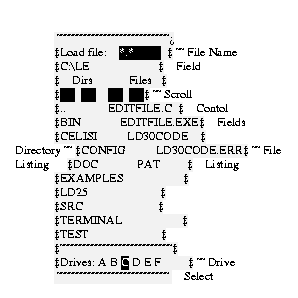
with the browser dialog box, as illustrated in Figure 4.
From here
the user can type in a file name, select a file from a list, change
directories, or change drives.
The browser dialog box consists
of five major sections: the file name field, the scroll control
fields, the directory listing, the file listing, and the drive
select fields.
The file name field is located at the top right
of the browser menu and is used to enter a file name or file name
pattern (contains one or more of '*' or '?').
When the enter
key is entered into this field, the file name is accepted.
If
it is not a pattern, the browser menu is closed, and the appropriate
action is taken on the named file.
If it is a file name pattern,
the file listing is updated with only those files which match
the pattern.
The directory and file listing sections are located in the middle
of the browser dialog box - the directory listing on the left
and the file listing on the right.
These contain a listing of
up to ten of the subdirectories and files of the current directory.
If there are more than ten subdirectories or files, the scroll
control fields for each listing can be used.
These are located
just above each listing.
Each has two controls, one for scrolling
up (on the left) and one for scrolling down (on the right).
When
one of these fields is selected, the corresponding listing will
scroll up or down.
Selecting one of the items in the directory listing section will
change the current directory.
A new directory and file listing
will be displayed.
The path of the current directory will be
displayed just below the file name field.
To move up one level
in the directory tree, the sub-directory name ".." can
be selected.
Selecting one of the items in the file listing section will accept
that file name.
The browser dialog box is closed and the appropriate
action is taken on the selected file name.
The drive select fields are located at the bottom of the browser
dialog box, labeled with the drive letters with the current drive
highlighted.
Selecting one of the drives will change the current
drive, update the directory and file listings, and update the
path of the current directory.
The ESC key can be used to abort out of the browser with a null
file name being accepted and the appropriate action being performed
for a null file (usually nothing).
However, a change of the current
directory or drive will take effect no matter how the browser
is exited.
Subsequent file I/O will be relative to the new current
directory and drive.
There are several shortcuts available for the browser that allow
the user to avoid having to move the cursor around a lot with
the cursor keys or the mouse.
They are listed below:
Each of the tools that conform to the Common User
Interface (LE Panel, LE ASMB, ED PLD, and TERM) have an identical
tools menu.
This menu consists of five selections used to start
up one of the tools or a DOS window.
The key strokes associated
with each selection are identical within each tool.
They are:
Each of the tools that conform to the Common User Interface (LE
Panel, LE ASMB, ED PLD, and TERM) use a common help system.
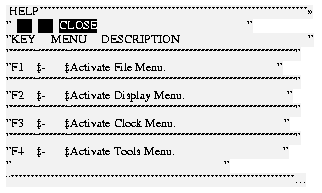
Figure 5 shows the help dialog box for the LE Panel tool.
The help dialog
box consists of three fields across the top and a display area
below.
The display area contains a portion of the help information.
The first two fields are used to scroll through the help information
and the third is used to close the help dialog box.
Most of the tools need to communicate with the LE Board at various
times.
In order to do this, the LE Board must be installed and
turned on.
Before any communication is attempted, the tool will
first determine if the LE Board is active, if so the communication
will take place, if not the communication is aborted and a dialog
box as shown in Figure 6, is displayed indicating that the LE Board
is not responding.
This dialog box can be closed by pressing
the
Another problem that can arise while communcating with the LE
Board is due to multitasking.
Since more than one tool can be
running at the same time, it is possible for more than one tool
to be commmunicating with the board.
The system allows only one
tool to communicate with the board at any one time.
The problem
can occur when the communications of several tools are interweaved,
such as:
(a) tool A reads the state of the board, while
The system does little to prevent this situation, so it is best
to avoid it.
It does attempt to prevent it if tool A and tool
B in the example above are the same tool.
In the case of the
LE ASMB and ED PLD tools, if subsequent instances of the tool
are opened, the subseqent ones are not allowed to communicate
with the board.
This is indicated by a bell when the window is opened.
In the case of the LE Panel tool, subseqent instances are not allowed.
If a second instance is opened it is immediately
closed and the first instance is raised to be the top window.
Logic Engine User Manual Index
[Contents]
[Prev: 2 Installation]
[Next: 4 Logic Engine Panel]
3.3 Menus

Figure 5. Display Menu for the LE Panel Tool
3.4 Dialog Boxes

Figure 6. Example Dialog Box from the LE Panel Tool
3.5 File I/O

Figure 7. The File Browser Menu
Home
Move the cursor to the File Name field
Page_Up
Scroll File Listing up
Page_Down
Scroll File Listing down
Scroll Directory Listing up
Scroll Directory Listing down
Selects the nth item in the File Listing,
where n is one of the numeric keys
(1 representing the first item and 0
representing the tenth item).
Changes to the directory indicated by
the letter c,
where c is one of the keys on the top row
of the keyboard starting with q
(representing the first item)
and ending with p (representing the tenth item).
Changes to the drive indicated by the letter
c, where c
is one of the keys on the bottom row of the keyboard starting
with z (representing drive A) and ending
with m (representing drive G).
3.6 Tools Menu
F10 - LE Panel
- LE ASMB
F11 - ED PLD
- TERM
- DOS
3.7 Help System

Figure 8. Example Help Menu from the LE Panel Tool
3.8 Communication with the LE Board

Figure 9. Dialog Box Presented when the LE Board is not Responding
(b) tool B changes the state of the board, just as
(c> tool A acts based on the state it read (which is now invalid)
