Support document for embedded debugging prototype from dissertation work of Bhanu Pisupati
The objective of this
exercise is to use filesystem abstractions to enable
concurrent debugging of software executing on
the various processing elements within a multi-processor prototype.
The prototype consists of two dissimilar processors in the form of
microcontrollers from Texas
Instruments and Philips belonging respectively to the MSP430 and LPC
product families; these devices are concurrently debugged on a workstation
using the exported filesystem interface. The
microcontrollers are based on processors with different architectures and debug interfaces.
The LPC device is based on a 32-bit ARM core and offers an
ARM-specific EmbeddedICE debug interface, while the MSP430 is based
on a custom RISC architecture
with a proprietary JTAG based debug interface.
The prototype is shown in the picture below:
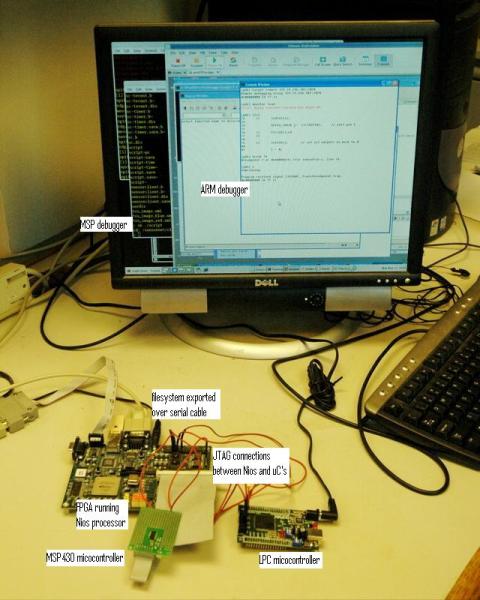
The picture shows two microcontrollers, an MSP430 device and an LPC device which execute software that
is being debugged in a workstation using virtual filesystem abstractions. The filesystem is implemented
using a soft processor named
Nios from Altera, implemented within an FPGA.
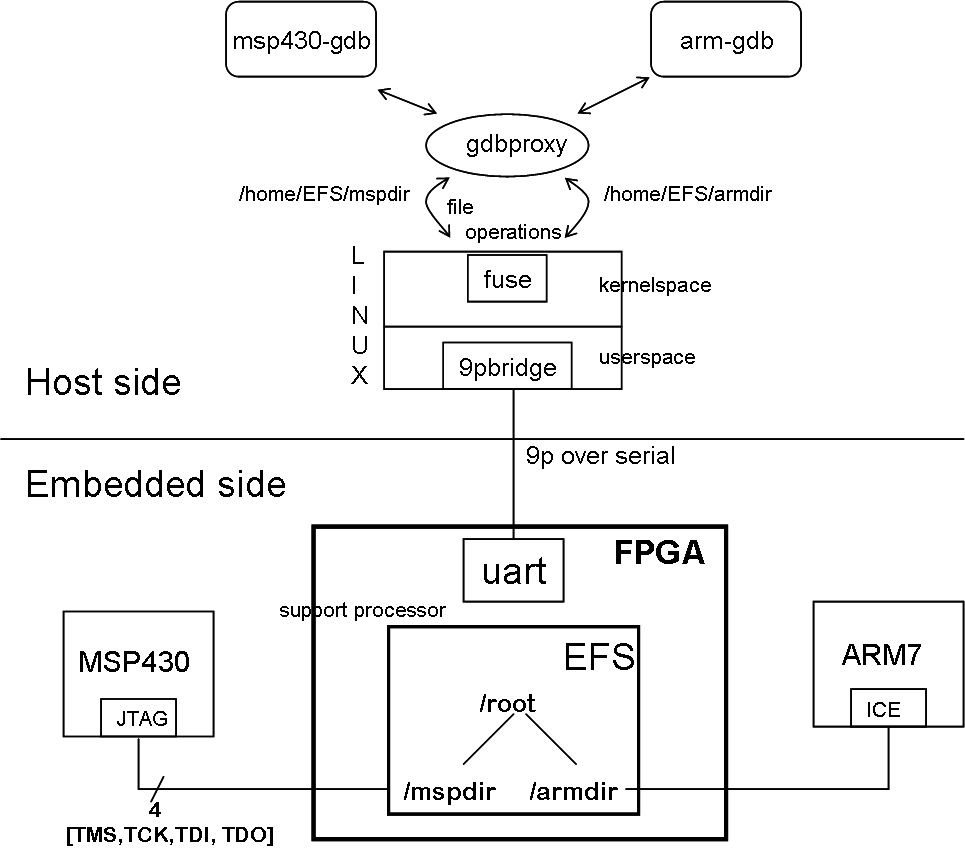
A block diagram of the prototype is shown below:
While my dissertation presents conceptual aspects of the prototype, this writeup outlines on the steps necessary to get it up and running. This involves a seris of steps as shown below:
- configuring FPGA with Nios processor hardware
- programming the Nios processor with filesystem software
- execute Fuse 9p-Linux bridge on the workstation
- startup the filesystem based proxies for the debuggers
- connect to the proxies from debuggers
I will now outline each of these steps:
Configuring FPGA with Nios processor hardware
Unzip and untar the swdir.tar.gz file. All software corresponding to the embedded software debugging work is located within the resulting swdir/embed directory.
This directory in turn contains a directory named nios_spdesign which contains both the hardware and software corresponding to the filesystem. Launch the Quartus II ver 4.2 tool, and within it open the project named 'standard' located in the nios_spdesign directory. This project represents the hardware necessary to implement the Nios processor.
The project has already been compiled and contains a 'standard.sof' file which has to be downloaded into the FPGA. Make sure that the Nios board's JTAG port has been connected to the workstation using a parallel cable. If Quartus is being run within VMWare, then additionally ensure that:
- the 'lp' module has been removed [rmmod lp]
- the user running the tool is in the lp groups (refer /etc/group), or that the parallel port is writable by everybody
Within the Quartus tool follow: Tools -> Programmer -> Start
This should trigger the download of the design into the FPGA.
Configuring Nios with 9P filesystem software
- Open: Tools -> SOPC Builder
- Within SOPC Builder: Tools -> Nios II IDE
- To see a list of all SW projects for this Nios processor: Windows -> Show View -> C/C++ Projects
- Select 'Npfschan' project
- To open this project: Project -> Open Project
- To run this project on HW: Run -> Run As -> Nios II HW
Executing Fuse 9p-Linux bridge on the workstation
First make sure that Fuse is installed on the workstation. Make sure that the serial cable from the Nios board is connected to the workstation.
Download the 9pserFusebridge
tools which contains the p9tofuse executable.
Run the tool as:
p9tofuse -d < mount point > -o direct_io
where mount point specifies the path where the contents of the exported 9P filesystem need to be mounted.
Starting up filesystem based proxies for the debuggers
Proxies for the ARM(LPC) and MSP430 devices need to be started to enable enable debuggers to indirectly interact with the parts.
To start the ARM proxy, cd to arm_fs_proxy directory.
If necessary, clean (make clean) and compile (make).
Start the proxy as follows:
./arm7_stub_fs
This starts up the proxy and listens on port 2020 for connections from ARM debuggers.
Note:
The proxy assumes that the Fuse bridge mounted the 9P filesystem contents at /home/bpisupat/mnt. Unforutnately, this path and the port number are hard-coded into the proxy implementation.
To start the MSP proxy, cd to the msp_fs_proxy directory.
If necessary, clean (make clean) and compile (make).
Start the proxy as follows:
./gdbproxy skeleton
This starts up the proxy and listens on port 2000 for connections from MSP debuggers.
Note:
The proxy assumes that the Fuse bridge mounted the 9P filesystem contents at /home/bpisupat/mnt. As with the ARM proxy, this path and the port number are hard-coded into the proxy implementation.
Connecting to proxies from debuggers
ARM gdb debuggers can connect to the hardware indirectly through the filesystem proxies. To do so, they need to use the remote target, specifying the appropriate IP address where the proxy is executing and port as 2020.
The same applies to MSP debuggers, with the one difference being that they connect to their debugger proxy at TCP port of 2000
Once connected, the debuggers are ready to be used for downloading, executing and debugging softwre on the ARM and MSP devices.